 Rotate pushrod while tightening adjuster nut.
Chevrolet 454 Valve Adjustment
Hydraulic Valve Lifter Adjustment
In the ease of disassembly, or any other cause for valve tappet adjustment, proceed as follows:
1. Adjust rocker arm nuts to eliminate lash. This must be done when lifter is on base of circle of cam.
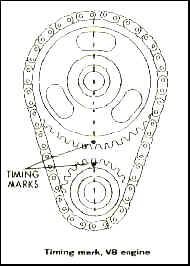
2. Remove distributor cap and crank engine until distributor rotor points to No. 1 cylinder terminal, with points open.
The following valves can be adjusted with the engine in No. 1 firing position:
Intake No. 1, 2, 5, 7, Exhaust No. 1, 3, 4, 8
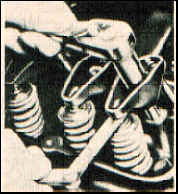
3. Turn adjusting nut until all lash is removed from this particular valve train. This can be determined by
rotating the pushrod back-and-forth with your finger tips, while tightening the
adjustment nut, until you can no longer rotate the pushrod. When all play has been removed, turn adjusting nut one more turn. This will place the lifter plunger in the center of its travel.
4. Follow steps 2 and 3 to adjust remaining valves.
|
Rotate pushrod while tightening adjuster nut. |
The following valves can be adjusted with the engine in the No. 6 firing position:
Intake No. 3, 4, 6, 8, Exhaust No. 2, 5, 6, 7
Readjust the lifters as follows with the engine hot and running.
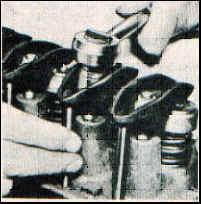
1. Remove rocker arm covers and
gaskets.
2. Place oil deflector clips on rocker arms.
3. With engine running at idle, back off rocker arm nut until it starts to clatter.
4. Turn nut down until clatter stops. This is the zero lash position.
5. Tighten nut down one-quarter
turn. Pause ten seconds. Repeat
additional quarter turns and ten
second pauses until nut has been
tightened down one full turn
from the zero lash position.
6. Repeat steps 3, 4, and 5 for all rocker arms.
7. Remove oil deflector clips and replace rocker arm covers.
 |
 Intake
Valve Clearance: .024 in. Intake
Valve Clearance: .024 in.Exhaust Valve Clearance: .028 in. |
Mechanical Valve Lifter Adjustment
1. Set engine in No. 1 firing position.
2. Adjust the clearance between the valve stems and the rocker arms using a feeler gauge.
Check the Tune-Up Specifications table for the proper clearance. Adjust the following Valves in No. I firing position:
Intake No. 2, 7, Exhaust No. 4, 8.
3. Turn crankshaft one-half revolution clockwise. Adjust the following valves:
Intake No. 1, 8, Exhaust No. 3, 6.
4.Turn crankshaft one-half revolution clockwise to No. 6 firing position. Adjust the following valves in No. 6 firing position: Intake No. 3, 4, Exhaust No. 5, 7.
5. Turn crankshaft one-half revolution clockwise. Adjust the following valves: Intake No. 5, 6, Exhaust No. 1, 2.
6. Run engine until normal operating temperature is reached. Reset all clearances.